Importing Data From In-Situ Data Logger Files
In-Situ has prepared a handy guide showing how to work with their data loggers.
This tutorial describes how to import data from a file recorded by an In-Situ data logger. The procedure for importing a file is summarized as follows:
- Convert the binary (.bin) file created by the data logger to a text (.txt) file using Data Manager component of the Win-Situ software provided by In-Situ. You can download the latest version of Win-Situ at the In-Situ web site.
- Use the Pumping Test Wizard or Slug Test Wizard in AQTESOLV to enter data for your aquifer test. When prompted for observation (time-displacement) data, launch the Import Wizard to import the text file containing the data logger measurements.
Create a Text File Using the Win-Situ Data Manager
After downloading data from the data logger, you need to convert the binary (.bin) file recorded by the data logger to a text (.txt) file using the Data Manager option in the Win-Situ application.
- Click the Data button on the Win-Situ toolbar to launch the Data Manager.
- In the Data Manager, choose File>Open to select and open the binary (.bin) file that contains the measurements recorded by the data logger. The Data Manager displays the measurements from the binary file in text format.
- From the Settings menu, choose the Units option to select units of measurement used by the Data Manager to display the data (e.g., minutes for elapsed time and feet for level or depth). Choose the Pressure option to display the pressure readings in raw pressure, depth or level format.
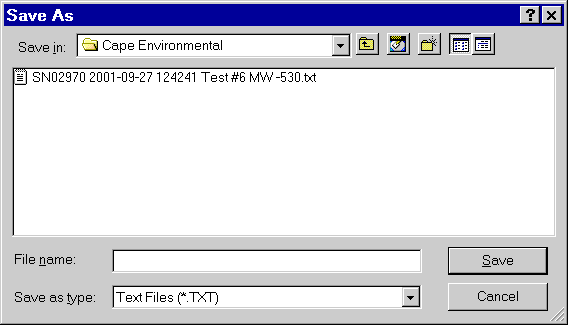
- Choose File>Save As to save the results displayed by the Data Manager. In the Save as type box, select the option for Text Files (*.txt). Enter a file name and click Save.
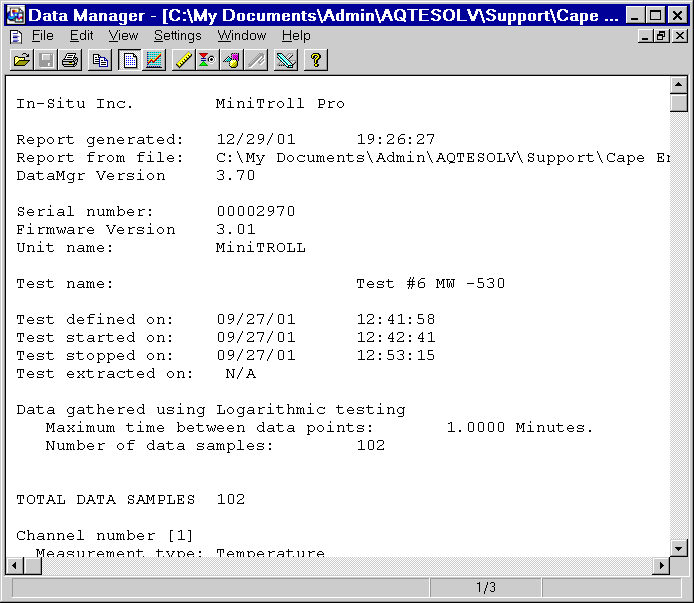
- At this point, take a moment to examine the readings displayed by the Data Manager. Scroll down until you see a table of measurements. In the example below, the table contains a total of five data columns with elapsed time in column 3, temperature in column 4 and water level in column 5. We will use AQTESOLV to import elapsed time (column 3) and water level (column 5).
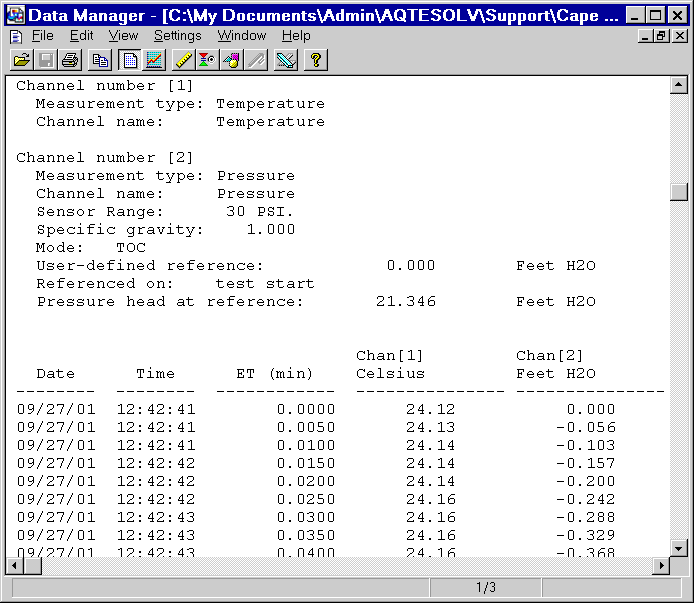
- Choose File>Exit to close the Data Manager application.
Import Data Logger File into AQTESOLV
After using Win-Situ to create a text (.txt) file containing the data logger readings, you are ready to enter your aquifer test data into AQTESOLV.
Start the AQTESOLV application (v. 3.0 or higher) and follow the steps below.
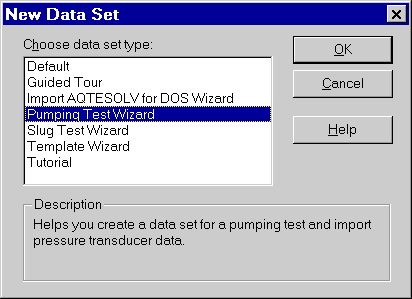
- Choose File>New and select Pumping Test Wizard or Slug Test Wizard from the list to create a new data set for a pumping test or slug test. Click OK to proceed.
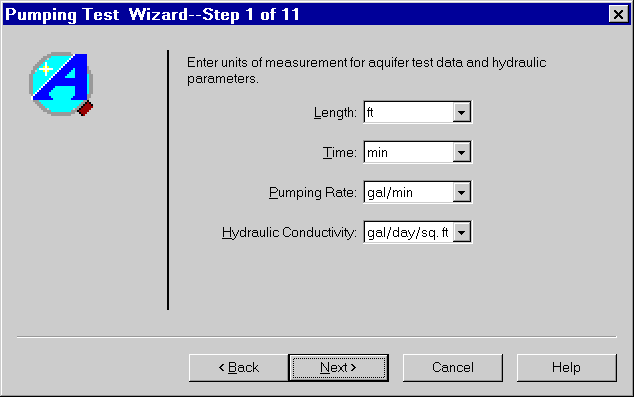
- Begin the wizard by entering units of measurement as shown and click Next.
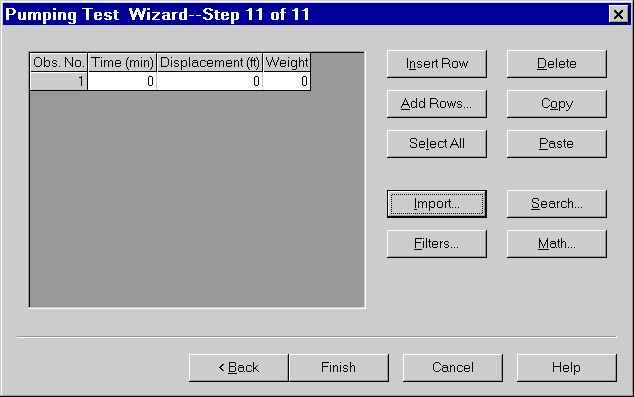
- Continue entering data in the wizard until you reach the last step which prompts you for the observation (time-displacement) data for the test. Click Import to launch the Import Wizard for importing the observation data from a file.
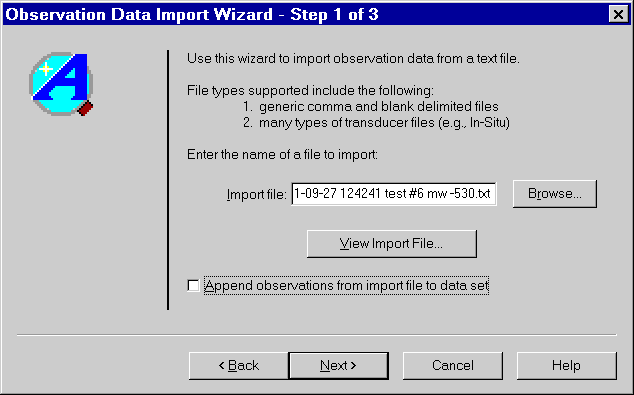
- The Import Wizard consists of three simple steps that help you to import data from a file. The import file must have text formatting (not binary) and data values separated by blanks, tabs, commas or quotes. In the first step of the wizard, enter the name of an Import File. Click Next to continue.
TIPS
Click Browse to locate and select a file to import. After selecting the file, click View Import File to view its contents.
Be default, the imported data overwrite any readings contained in the AQTESOLV data set. Override this behavior by selecting the option to Append observations from import file to data set.
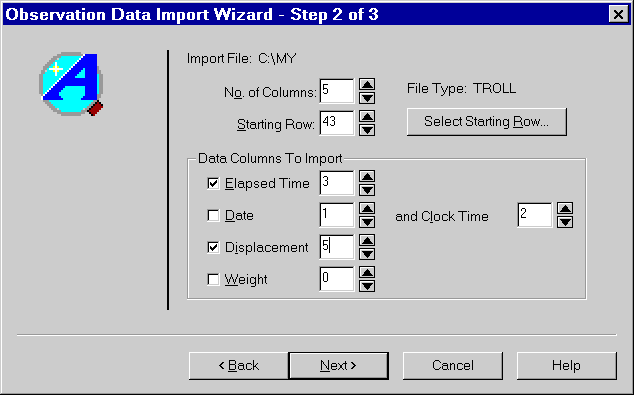
- In the second step of the Import Wizard, identify the structure of the import file. Enter the number of data columns and starting row in the file, and the data columns to import. Click Next to continue.
TIPS
AQTESOLV automatically scans the import file to identify the No. of Columns and Starting Row for data contained in the file. Click Select Starting Row to modify the number of columns and starting row.
Enter Data Columns To Import that match the structure of your import file. Typically, you will select elapsed time and displacement values to import. The Import Wizard also allows you to import time recorded as date and clock time values when an elapsed time column is not available. For example, if your data logger file contains a total of five data columns with elapsed time in column 3 and water-level displacement in column 5, enter the values shown below.
The Weight column is optional; if your file does not contain weights for the readings, AQTESOLV assigns a default value of 1.0 for each reading.
- In the third step of the Import Wizard, select transformation and filter options to modify the data contained in the import file. Click Finish after selecting these options to import the file.
TIPS
The Pre-Filter Operations allow you to perform common transformations on the data. For example, to convert water levels or depths contained in the import file to displacement (drawdown) values, subtract the static water level or depth from all of the readings in the file. You can perform this transformation by selecting the option in Time Filters group to subtract a constant from the displacement values and entering the static water level or depth (see example below). Other useful options allow you to multiply time and displacement values by a constant. For example, to convert negative displacements to positive values, check the option for multiplying displacement values and enter a constant of -1.
Click Filters to choose options for filtering data imported from the file. Select Retain change in log time >= minimum to retain a fixed number of readings per log cycle time. For example, to retain 10 readings per log cycle, enter a value of 0.1 (=1/10) for this option. Other options allow you to specify a retention interval (e.g., retain every fifth observation), a minimum change in displacement for retaining observations (i.e., discard readings until the change in displacement exceeds the minimum value), and a time window for applying the filters. You can select more than one filter option for your import file.


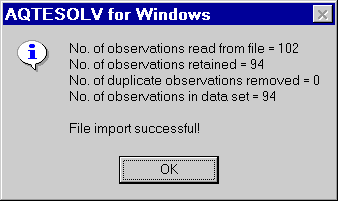
- After importing the file, AQTESOLV shows a summary of the data read from the file. Click OK to continue.